For File 365 to work, a link between Salesforce and Microsoft 365 (Azure AD) must be setup. You can use the technology and features that are built-in the Salesforce platform to authorize File 365 to access the files in SharePoint or in a secure way.
1.1 Configure in Azure AD: Application Registration (1) #
First, we must register the application in your Azure tenant and assign the required API Permissions. To do this, login to your Azure Portal as an administrator and select the Azure Active Directory Service.
You can find it by clicking “All Services” and search for “Azure Active Directory” in the search box.
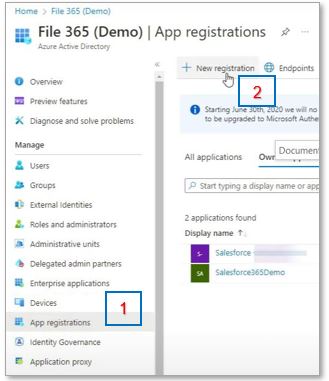
In the left menu, go to the “App registration” [1] section and and click “New Registration”[2]
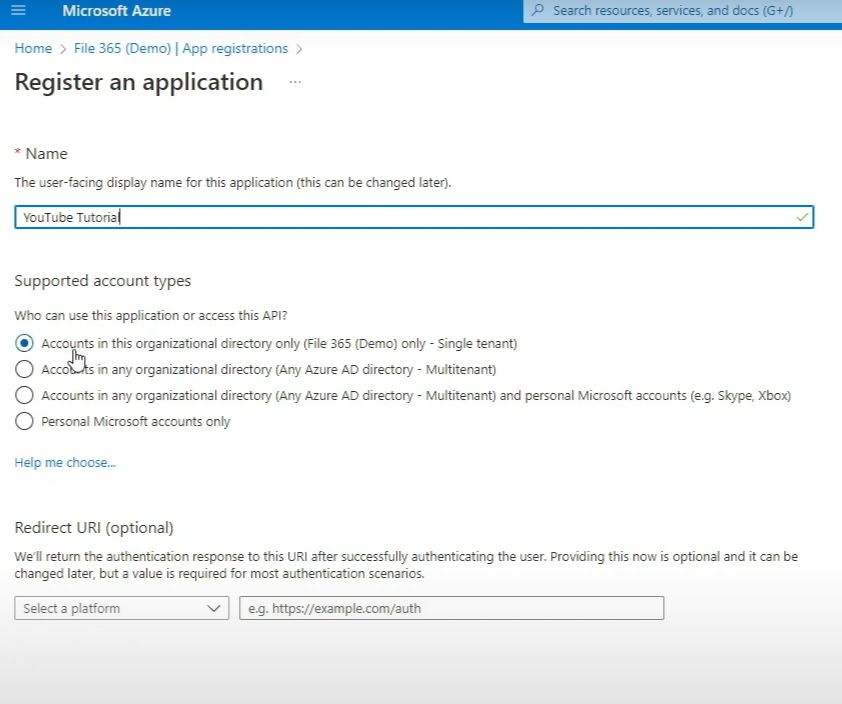
Type a name so you know where the application is in use. Here we will use: “YouTube Tutorial” and select “Accounts in this organizational directory only” in the supported account types section. Leave the Redirect URI blank for now, we’ll fill that later. Click Register to create the application, the application page opens.
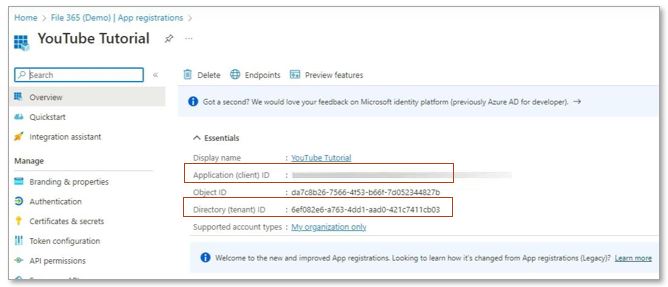
On top of the application page, you can find the Application and Tenant Ids. Take note of these as we need them to create the Authentication Provider in Salesforce. But before we go to Salesforce, we need to set up the application further.
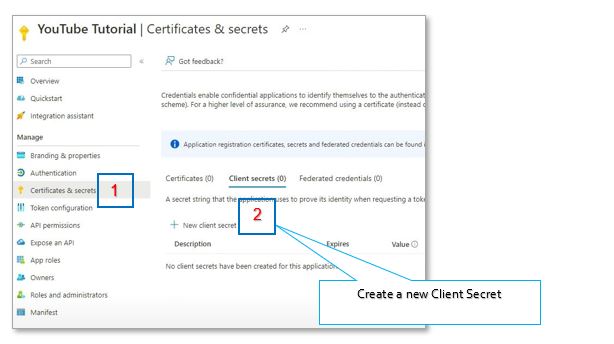
Go to the Certificates & secrets section [1], and click New client secret [2]. Create a new client secret. This is the secret Salesforce will use in the authorization flow.
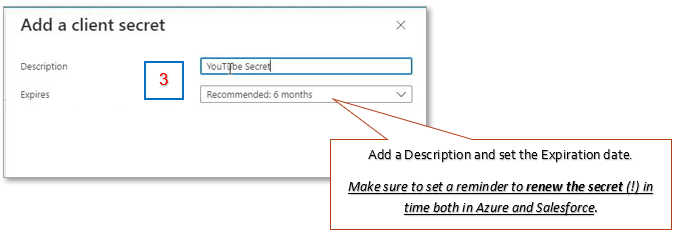
Add a Description, and set the Expiration date [3]. Do not forget to set a reminder for yourself to renew the secret both in Azure and Salesforce. Please note that if the client secret is expired, you will get an authentication (401) error. Finish by clicking Add on bottom of the page.
The secret will be generated by the Azure portal. Be sure to copy the value of the generated secret and store it at a safe location, we will need this information later when creating an Authentication Provider in Salesforce (see par. 1.2).

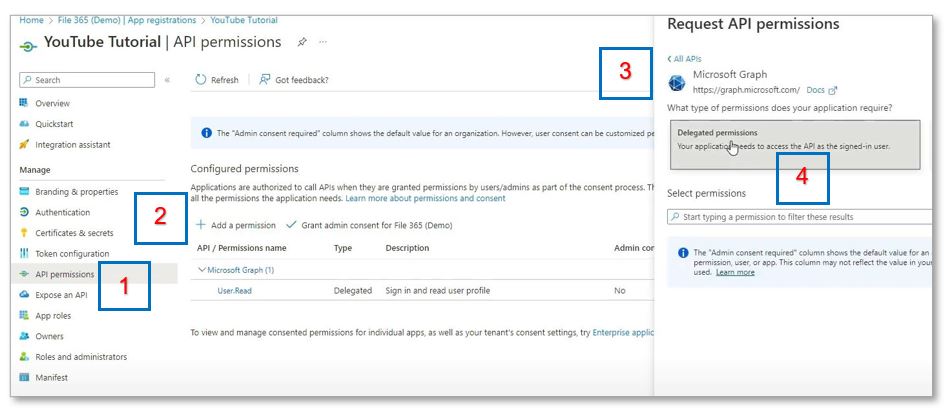
Now we need configure the API permissions required by the application. Go to the API permissions [1] section. Click Add a Permission [2], Microsoft graph [3], and Delegated permissions [4].
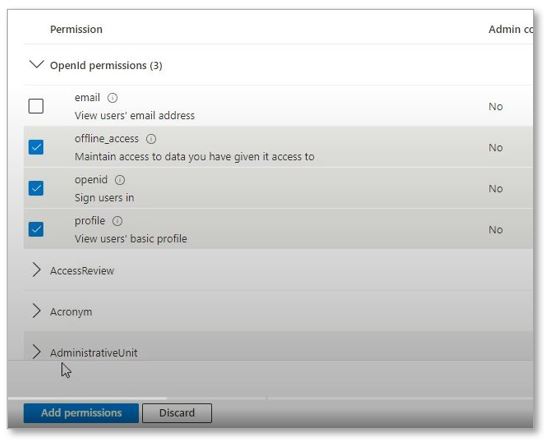
After clicking delegated permissions, under Openid permissions, select the following:
Offline_access, openid and profile. Click Add permissions.
Do the same but then go to SharePoints delegate permissions: Click Add a Permission [1], Click SharePoint [2], and Delegated permissions [3]. After clicking Delegated permissions, expand the AllSites menu [4]:
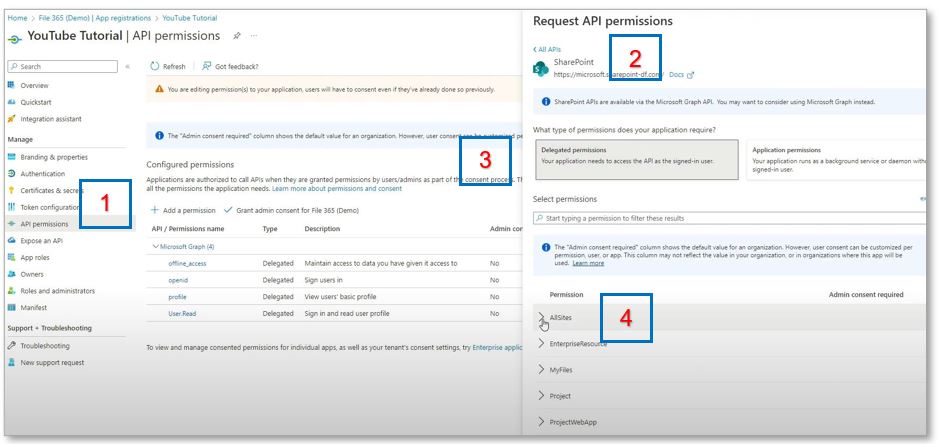
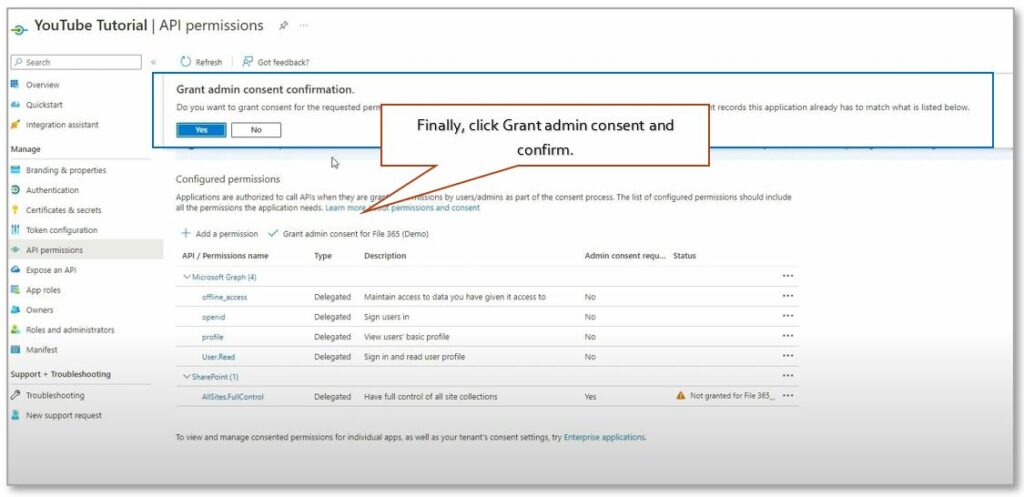
Select AllSites.FullControl and Click Add permissions. Now, after confirming the configured permissions, click Grant admin consent for File 365 (Demo) and confirm in the pop up.
After you have granted admin consent, the permission section should look like this:
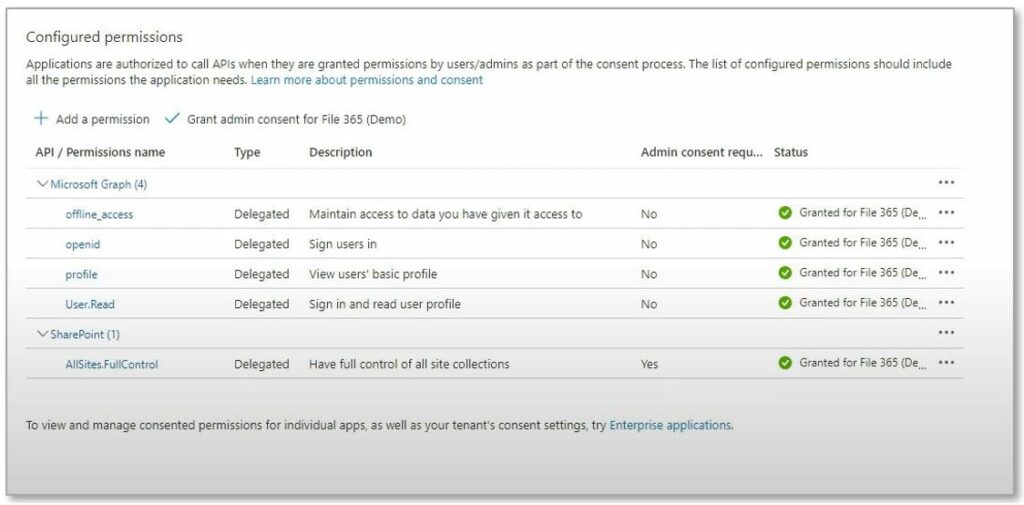
You have now successfully registered the application in your Azure tenant and assigned all the required API Permissions.
1.2 Configure in Salesforce: Authentication Provider #
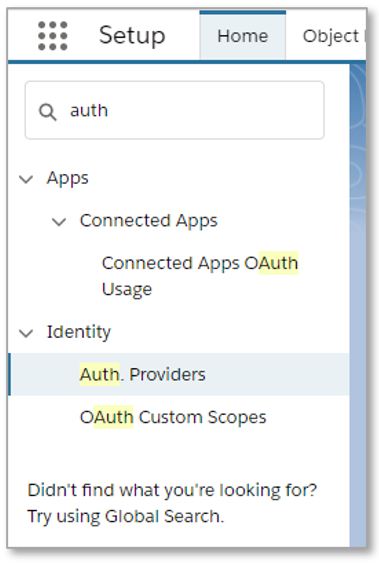
Now login to Salesforce as an administrator and open Setup. Find the “Auth. Providers” in the Identity section.
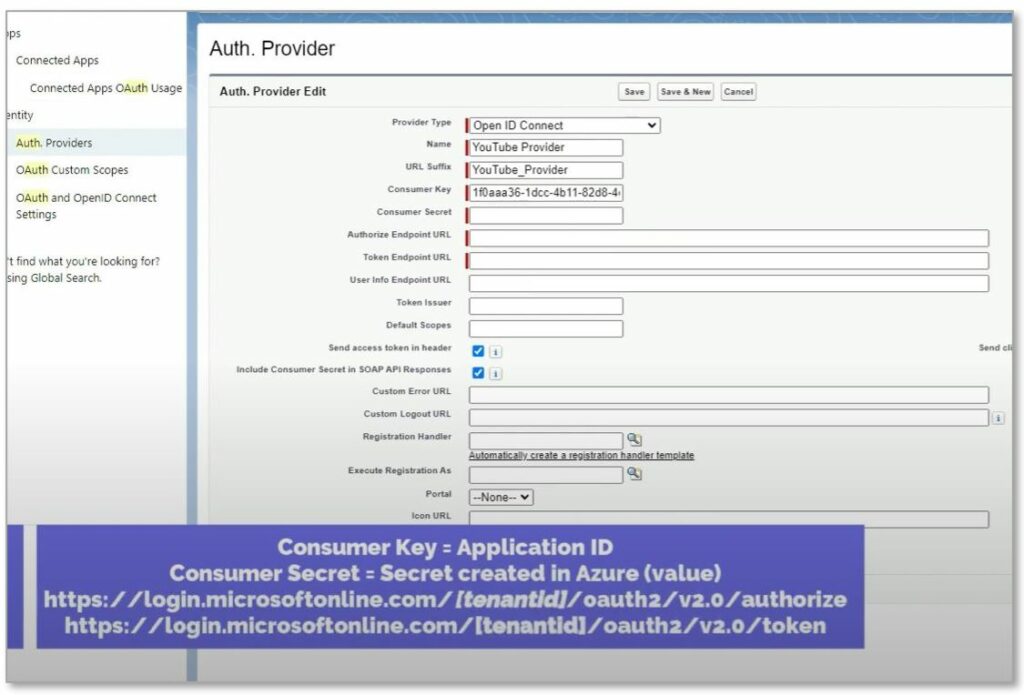
Add a new Auth. Provider with Provider Type Open ID Connect. Choose a name and a URL Suffix.
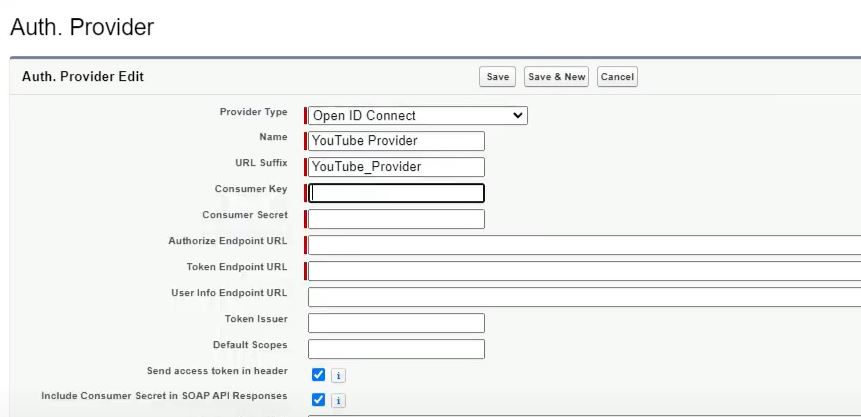
Next, fill in the Consumer Key and Consumer Secret and other required fields by following the instructions below. For the Authorize Endpoint URL and the Token Endpoint URL, copy the URL and replace [tentantid] by the tenant ID of your Azure tenant. Lastly, define the default Scopes as “openid offline_access”.
| Consumer Key | Use the Application ID of the registered application in Azure |
| Consumer Secret | Use the Value of the Secret created in Azure for the application (not the ID) |
| Authorize Endpoint URL | https://login.microsoftonline.com/[tenantid]/oauth2/v2.0/authorize * |
| Token Endpoint URL | https://login.microsoftonline.com/[tenantid]/oauth2/v2.0/token * |
| Default Scopes | “openid offline_access” |
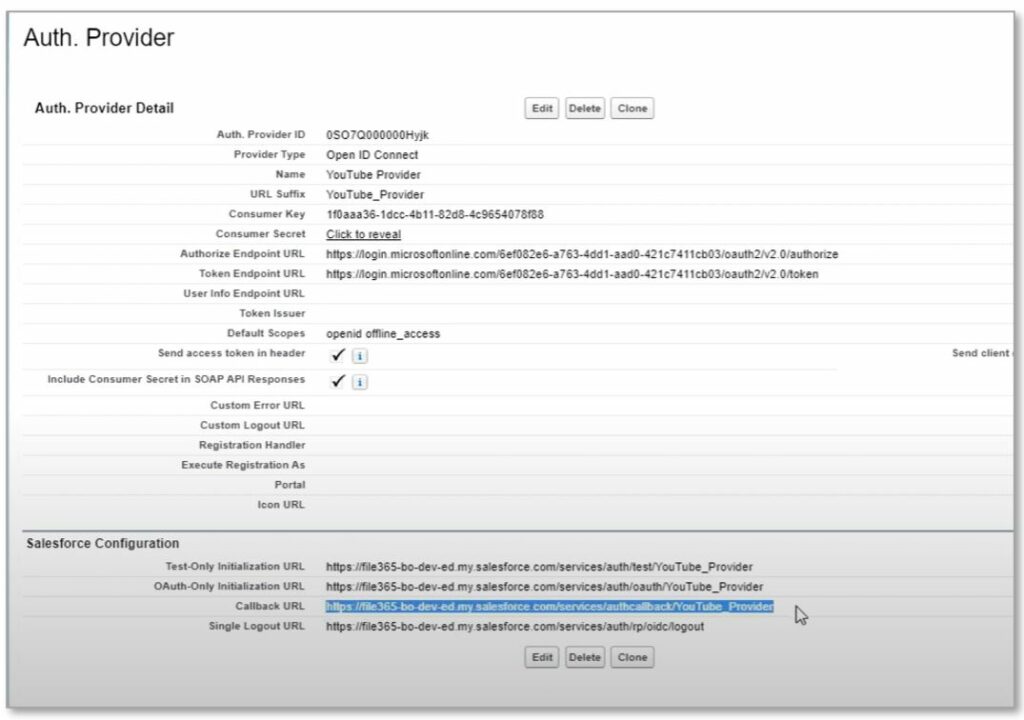
When you click save, the Auth. Provider page opens. Copy the “Callback URL” in the “Salesforce Configuration” section near the bottom of the page. We need to enter that URL in the Azure Application registration (see par. 1.3).
1.3 Configure in Azure AD: Application registration (2): Add Redirect URL #
Open the Application Registration you just created in Azure AD. Go to the Authentication section [1] and click “Add Platform [2] and choose Web [3 ].
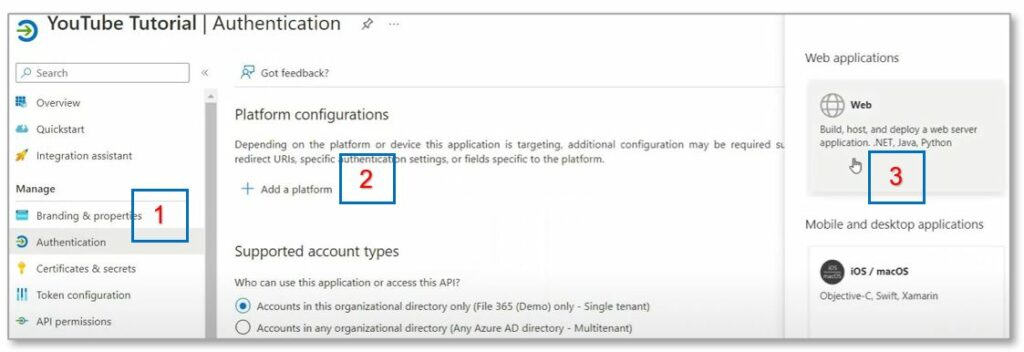
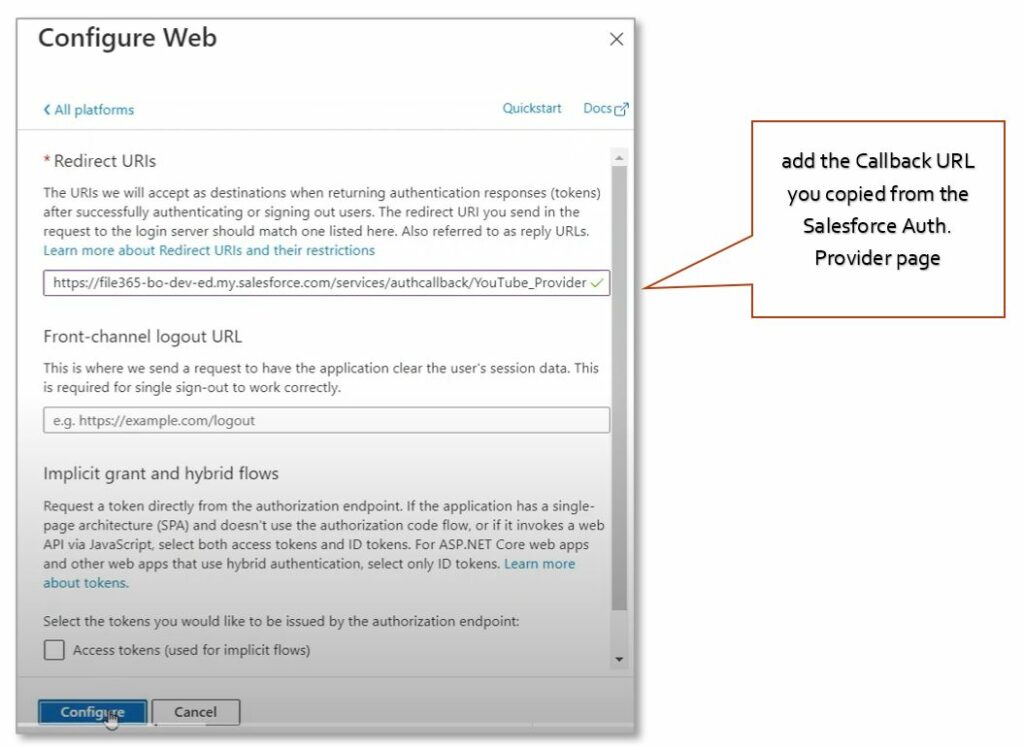
In the Web configuration, add the Callback URL you copied from the Salesforce Auth. Provider page in the Redirect URI field. Leave other options blank and click “Configure”. The Azure AD Application Registration is now complete.
1.4 Configure in Salesforce: Named Credential #
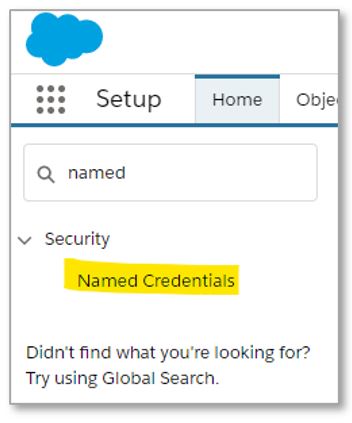
Now go back to Salesforce Setup and find the “Named Credential” section in the menu. Use the dropdown arrow on the right and click New Legacy.

1.4.1. Named Credential Identity Type #
Before creating a Named Credential, you will have to decide what Identity type to use. You can choose Per User or Named Principal.
1.4.1a. Named Principal #
Using Named Principal authentication and authorization means File 365 will connect to SharePoint with the same account for all Salesforce users. This means all connections to SharePoint will be made from a single account. All Audit trails would log this account instead of the user that actually performed the actions that File 365 executes for your users.
1.4.1b Per User #
Using Per User authentication and authorization means File 365 will connect to SharePoint impersonating each user individually. What does this mean? Every action performed by File 365 in SharePoint will be done (from a SharePoint point of view) with the actual SharePoint user linked to their account.
For example. When a user uploads a document into Salesforce and File 365 is configured to move that document to SharePoint, the upload into SharePoint is done by impersonating the user that uploaded that document to Salesforce. Audit trails in SharePoint will show the actual username, instead of a service account.
If you choose the Per User Identity type, an extra step is required, which means that every user will have to authorize Salesforce to use their SharePoint credentials. How to do this is explained in the Authenticate User to SharePoint section (File 365 User Instructions paragraph 1.1).
1.4.2. Create Named Credential #
Add a new Legacy Credential by clicking on the arrow next to ‘New’ and click New Legacy.
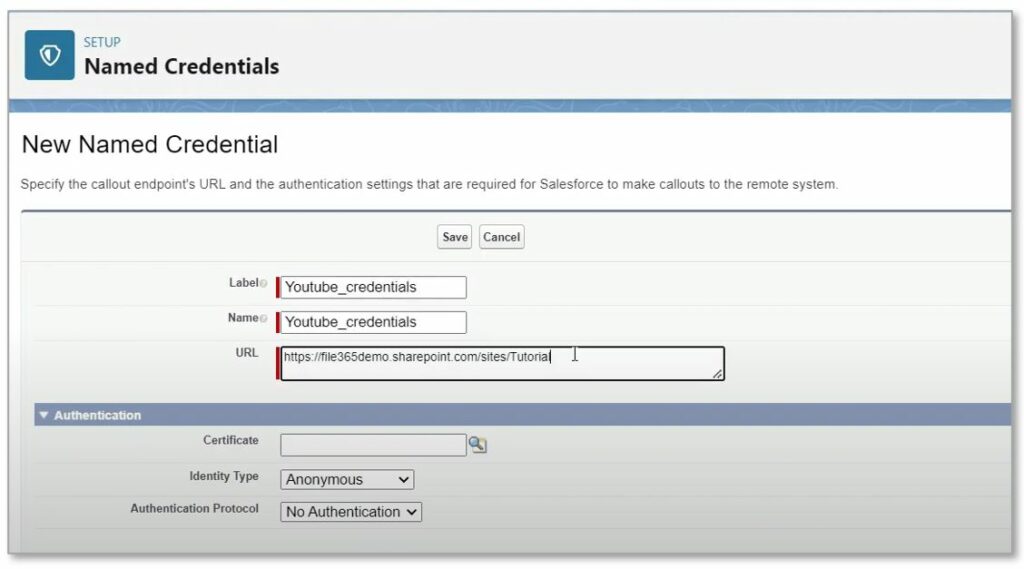
Provide a label and name for this credential. Choose a name that you and your users will recognize as your SharePoint environment. For File 365 you will create a named credential for each SharePoint site collection. The URL is the root path of your site collection. So, for example for the default Site Collection this would be: https://tenantname.sharepoint.com where “tenantname” is the name of your tenant.
Set the following values in the Authentication section:
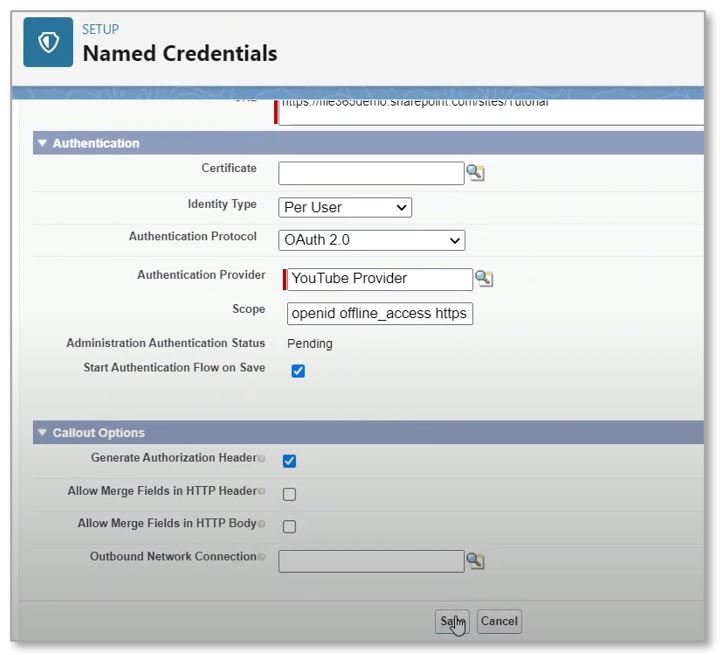
| Identity Type* | Per User or Named Principal |
| Authentication Protocol | OAuth 2.0 |
| Authentication Provider | Select the Auth. Provider you just created |
| Scope ** | openid offline_access [URL]/AllSites.FullControl |
| Start Authentication Flow on Save | Check the box to start the authentication flow on save |
| * Identity Type : Choose Per User authentication or Named Principal (service account) for access to SharePoint (see par. 1.4.1 ) **Scope: Replace [URL] in the Scope field by the URL to the root site collection of your own SharePoint Online tenant: https://tenant.sharepoint.com e.g. https://[companyname].sharepoint.com | |
Leave other fields default. When you click Save, Salesforce will redirect to a Microsoft Authorization page to authorize Salesforce to use the application. If needed, login with your Microsoft administrator account to approve the authorization.

